![]()
관리 페이지에 접근하려면:
관리 메뉴에서 관리 > 관리 홈 을 선택하십시오.
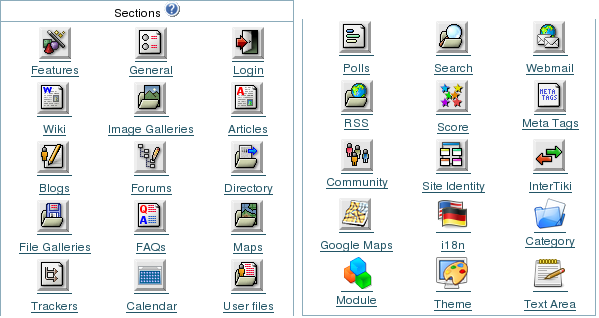
아래의 그림에서 보여진 것처럼 섹션 티키 구성 패널이 보일 것입니다 (티키 구성 을 참고하십시오):

관리 페이지에서, 위키 아이콘 ![]() 을 클릭하십시오. 위키 관리 페이지가 나타탑니다:
을 클릭하십시오. 위키 관리 페이지가 나타탑니다:
A 덤프 는 XHTML 형식으로된 위키 페이지들의 스냅숏입니다 . 백업, 오프라인 탐색, CD를 통한 배포, 프리젠테이션 등등에 대하여 덤프를 생성하고 다운로드할 수있습니다. 티키는 덤프를 ../dump 디렉토리 안에 타르(TAR) 형식으로 저장합니다 . 5.0 버전부터는, 덤프 가 위키 페이지에 의하여 링크가 걸린 첨부파일들을 포함하지 않는다는 점에 유의하십시오.
이 기능을 사용하려면 덤프 선택사항을 활성화하여야만 합니다.
관리 페이지의 기능 탭에서 덤프 선택사항을 활성화하십시오:
| 필드 | 설명 |
|---|---|
| 덤프 생성 | 덤프를 만드려면 덤프 생성 링크를 클릭하십시오. |
| 최종 덤프를 다운로드 | 피씨에 최신 덤프 (new.tar) 를 다운로드하려면 최종 덤프 다운로드 를 클릭하십시오. |
| 현재 위키에 대한 태그 | 위키 페이지의 현재 상태를 식별하기 위한 표식을 만드려면 태그를 사용하십시오. 태그는 실수로 인한 삭제 혹은 그 외 문제가 발생한 경우 위키 페이지를 복구하는 것을 돕기 위하여 사용될 수 있습니다. 태그로, 위키 페이지들을 이전의, 좋은 상태로 복구할 수 있습니다. 위키의 현재 상태를 식별하기 위하여 새 태그를 만드려면, 태그명 으로 가서 만들기를 클릭하십시오. |
| 위키를 태그로 복원 | 위키 페이지를 이전 상태로 복원하려면, 그 상태의 태그를 선택하시고, 복구를 클릭하십시오. 위키 페이지들은 태그를 만들었을 때의 상태로 복원될 것입니다. |
| 태그 제거 | 태그는 많은 공간을 차지할 수 있습니다. 더 이상 필요하지 않은 태그는 제거하는 것이 좋습니다. 태그를 삭제하려면 태그명 을 선택하시고 삭제를 클릭하십시오. |
이 기능을 사용하려면 댓글 선택사항을 활성화해야 합니다.
위키 관리 페이지에서 기능탭에 있는 댓글 을 활성화하십시오:
| 필드 | 설명 |
|---|---|
| 댓글의 기본 수 | 한 번에 보여질 댓글의 수를 입력하십시오. 페이지가 추가의 댓글을 포함하는 경우, 티키는 다음/이전 링크를 만들 것입니다 ("기본 = 10") |
| 댓글 기본 순서 | 댓글이 어떻게 보여지는 지를 지정하십시오: 점수: 가장 높은 점수 값의 댓글이 먼저 보여집니다. (기본) 최신 우선: 가장 최신 댓글이 먼저 보여집니다. 오래된 것 우선: 가장 오래된 댓글이 먼저 보여집니다. |
| 기본으로 목록 표시됨 | 댓글이 자동적으로 위키 페이지에 보여지는지 여부를 지정합니다. 활성화되지 않은 경우 사용자는 댓글을 보기 전에 먼저 댓글링클르 클릭해야만 합니다. 이 선택사항은 티키 2.0에서 소개되었습니다. |
| 페이지당 댓글 허용 | 티키 4.1에서 댓글 선택사항이 활성화되고나면, 편집 화면의 도구 섹션에서 페이지 기반 당 댓글을 허용/비허용 할 수 있습니다: 비활성화 (기본) 는 댓글 선택사항을 기본 상태로 남겨둡니다. 즉, 댓글은 어떤 위키 페이지에도 추가될 수 있습니다. 활성화 (기본상태 켜짐) 은 각 페이지로 하여금 페이지 당 댓글이 허용되거나 혹은 비허용되는 것을 관리하는 것을 가능하게 하며, 모든 페이지에 대한 기본값은 켜짐입니다. 즉, 댓글이 허용된다는 것입니다. 활성화 (기본 꺼짐) 는 각 페이지로 하여금 댓글이 페이지마다 허용되거나 혹은 비허용되는 것을 가능하게하며 모든 페이지에 대한 기본값은 꺼짐으로 설정되어 있습니다. 즉, 댓글이 허용되지 않는 것입니다. |
선택사항을 입력하시고 설정 변경을 클릭하십시오. 댓글이 위키 페이지들 상에서 표시될 때, 상요자는 기본 설정을 재정의할 선택권이 주어지며 댓글을 다른 방식으로 정렬할 수 있습니다.
위키 페이지는 첨부된 파일을 보유할 수 있습니다 (첨부파일). 첨부파일은 데이터베이스 혹은 파일 디렉터리에 저장할 수 있습니다. 첨부파일의 최대 크기는 웹서버의 PHP.INI에 upload_max_filesize 설정에 의하여 지정됩니다. 기본으로 최대 업로드 크기는 2MB 입니다.
디렉터리 경로는 절대경로이거나 티키 디렉터리에 대하여 상대경로일 수 있습니다.
위키 관리 페이지의 기능탭에서 첨부파일선택사항을 활성화합니다:
| 필드 | 설명 |
|---|---|
| 위키 첨부파일 | 파일이 위키 페이지에 첨부될 수 있는지 여부를 지정. 권한을 보유한 사용자들은 위키 페이지에 첨부파일 버튼을 보게될 것입니다. |
| 파일을 저장하기 위하여 데이터베이스 사용 | 선택된 경우, 위키 페이지에 첨부된 파일들은 BLOB로 변환되고 티키 데이터베이스의 tiki_wiki_attachments 테이블에 저장될 것입니다. |
| 파일을 저장히가 위하여 디렉터리 사용 | 선택된 경우, 위키 페이지에 첨부된 파일들이 지정된 디렉터리에 저장될 것입니다. 디렉터리는 절대 경로 ( http://www.foo.bar/attachments/_ 와 같은) 혹은 티키 설치 디렉터리에 대한 상대 경로 (attachements/ 처럼)가 될 수 있습니다. |
| 기본으로 펴시될 목록 | 댓글이 위키 페이지에 자동으로 표시될지 여부를 지정합니다. 활성화되지 않은 경우, 사용자들은첨부파일을 보거나 추가하기 전에 첨부파일 버튼을 클릭하여야만 합니다. 이 선택사항은 티키 2.0에서 소개되었습니다. |
| 위키 첨부파일 | 이 영역은 현재 첨부파일 전체를 나열합니다. 이 영역을 이용하여 첨부파일 저장 위치를 데이터베이스로 할 것인지 파일로 할 것인지 변경할 수 있습니다. 이 필드는 티키 1.9에서만 있습니다 |
선택사항들을 입력하시고 기본설정 변경 을 클릭하십시오
In the Wiki Administration area, click Manage attachments preferences.
Use the Wiki Attachments page to manage the existing attachments.
The Wiki Attachments page appears. This pages lists all current attachments.
The Export link can be used to export all your Wiki pages to a PHPWiki compatible format. Then you can import pages if you want using the Import PHPWiki Dump link in the Admin menu. Each page is exported to a file where all the versions of the page are stored in MIME format.
Enable the Export option on the Features tab of the Wiki Administration page:
You must enable the Export option to use this feature.
This link can be used to remove all the pictures that are stored in the Wiki pictures directory (img/wiki_up) but are not referenced in any Wiki page.
Enable the Pictures option on the Features tab of the Wiki Administration page:
You can select any wiki page to be the "home" page of your Wiki. This page will be shown from the Wiki > Wiki Home menu option.

Enter the name of the wiki page and click Set. If the page does not exist, Tikiwiki will create it for you.
Note: To use this wiki page as the "home" page for your entire site, you must select Wiki as the Home Page on the General Admin page.
Tikiwiki can automatically create a forum thread for each wiki page. The forum thread will be named the same as the Wiki page. You can specify in which forum the thread is created. This allows users to create an open discourse about pages using the public forums.
You must enable the Forum feature to use this option.
Enable the Discuss pages on forms option on the Features tab of the Wiki Administration page:
| Field | Description |
|---|---|
| Discuss pages on forums | Enabling the option will add a Discuss button on every Wiki page that links to a forum thread dedicated to discussion the particular page. This option is available only when the Forum feature is enabled. |
| Forum | Select the forum to be used for the page's thread (discussion). The forum must already be created. |
| Create forum | This button appears only if there are no existing forums. |
The Discuss feature is similar to the Comments feature. Although both can be used at the same time, it may be best to select only one.
This is a feature to allow wiki pages to be staged before they are approved. This is useful, for example, to have a staging area where open contributions are welcome, but at the same time to have an official knowledge base that is extremely stable, hence needing some kind of approval before page changes are shown there.
For more information about configuring this feature, see Wiki Page Staging and Approval
This section can be used to enable/disable specific Wiki features.
The Sandbox page allows users to practice their Wiki page editing skills. The Sandbox is a special page where everybody has write permission and no history is saved.
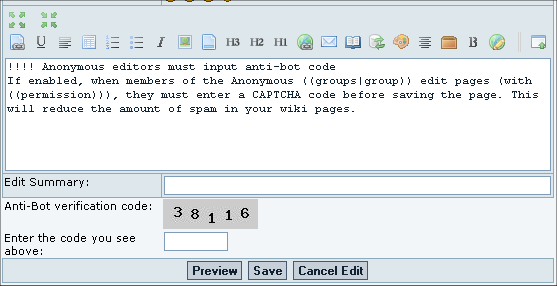
If enabled, when members of the Anonymous group edit pages (with permission), they must enter a CAPTCHA code before saving the page. This will reduce the amount of spam in your wiki pages.

If enabled, the Last changes option will be available from the Wiki menu. Users (with permission) will be able to list the last (most recent) changes to the Wiki.
If enabled, dumps can be created and saved.
If enabled, users can {ALINK(aname=Export_Wiki_Pages}export{ALINK} individual pages and structure pages content as a file (requires tiki_p_admin_wiki permission).
This allows you to add a poll from polls feature to any wiki page. The poll is unique to the page, created from a "poll template" which is created in the Polls feature: set a poll's 'active' drop-down to "template". You may have to adjust your groups permissions for tiki_p_wiki_view_ratings and tiki_p_wiki_vote_ratings.
If enabled, users (with permission) can see the history of each Wiki page.
If enabled users (with permission) can see the Wiki syntax of the Wiki page.
If enabled users (with permission) can see the list of Wiki pages--like a directory of Wiki pages. Use the Wiki Page List Configuration area to select the specific information to display.
Allows users to view a list of pages, called backlinks, that link to the current page.
If enabled, users can see a listing of pages named similarly to the current page.
Note: Prior to release 1.9.11, this option was called Like Pages.
If enabled, users can see several charts or rankings about the Wiki.
If enabled a section is provided where a user can select several Wiki pages and then view them in a printer-friendly version. This can be used to print multiple pages.
If enabled Wiki pages can be converted to PDF format for printing, archiving, or other purposes. There are known bugs in the PDF generation.
This option was removed in Tiki 2.0
If enabled, Wiki pages can have comments. This feature overlaps the Wiki Discussion__ feature, you can read the note about Wiki pages comments/discussion at the bottom of this page.
See Page Comments for more information.
If enabled, users editing a Wiki page can select a template for the page. A template is a pre-defined content for a Wiki page. See Content Templates to learn how to create templates for wiki pages.
If enabled users can quickly add images (pictures) to a Wiki page by simply uploading the picture when editing a page. The picture will be stored in img/wiki_up using the name of the picture as an ID.
Use the Remove Unused Pictures to remove any pictures that have been uploaded but are no longer used in a wiki page.
If enabled then Wiki pages can be cached, so the page is remembered after being generated and the Tiki engine will not have to parse the page content to display it. After the indicated time passes or if the page is changed, the cache is invalidated. In versions >= 2.1, the cache is only used for anonymous visitors, so user permissions do not affect the cache.
If enabled then cache times can be set for each individual page, overriding the global cache time setting.
If enabled and if the user's notepad feature is enabled and if the user is logged a save icon will be shown when viewing a page, letting the user save the page to his or her personal notepad.
If enabled then users with permission to lock pages can lock pages and only the user who locked a page or admin can unlock it.
If enabled then words using the Wiki naming convention of Smashed words will automatically become links. WikiWords start with capital letters and include capitals in the middle of the word (example: ThisIsAWikiWord).
![]() Note: In Tiki 1.9, this option was enabled, by default, for new installations. Starting with 2.0, this option is no longer enabled, by default, for new installations.
Note: In Tiki 1.9, this option was enabled, by default, for new installations. Starting with 2.0, this option is no longer enabled, by default, for new installations.
If enabled, Tikiwiki will allow WikiWords to include dashes and underscores.
You must enable the Use WikiWords option to use this feature.
If enabled, Tikiwiki will automatically link (combine) singluar and pluarl WikiWords. For example, the WikiWords MyWord and MyWords will link to the same wiki page: MyWord.
You must enable the Use WikiWords option to use this feature.
If enabled, each user will have a personal wiki page which only (s)he can edit. The prefix is configurable.
If enabled then users who create a page are also in control of that page. They have administrators rights over it.
This selects which Wiki syntax to use for cretaing rows within tables. Select either: || or \n (line break).
|
Using || for new rows Copy to clipboard
|
Using \n for new rows Copy to clipboard
|
If this is enabled, adjacent lines of text will be formatted as paragraphs. Paragraphs are separated by blank lines or Wiki commands.
If enabled (and if the Use Wiki paragraph formatting option is enabled), Tikiwiki will use the paragraph formatting options, but paragraphs will remain within the same element, but will contain spacing.
If this is enabled, the Tiki code lines starting with at least one space are interpreted and rendered with monospaced font. Generally if you have occasional users this can get them puzzled and wondering what's happening.
As an alternative, you can use the monospace wiki syntax (-+monospace+-) to create monospaced font.
If enabled users can generate slideshows from structures.
If enabled, a Make Structure button will be added to Wiki pages. Using this button will create a new structure with the current Wiki page automatically added as the "head" of the structure. See Structure Admin for more information.
This feature was added in Tiki 2.0.
Allows categories to be applied to structures on creation.
This feature was added in Tiki 2.0.
If enabled, the Structure Admin page will include a new option for generating WebHelp (an self-contained, HTML "help" version of the Wiki structure). Use this option to distribute Wiki pages to offline users in a usable format.
If enabled, Tikiwiki will automatically add the external link icon to all external links (created with the [link] wiki syntax).
By default, Tikiwiki uses img/icons/external_link.gif (![]() ) as the icon.
) as the icon.
Enter a unique prefix to add to each wiki page to idenfity all User Pages.
You must enable the User's Page option to use this feature.
-> Note: as of Tiki 6.1 (and maybe others) the prefix cannot be blank and you must include a : (colon) as the last character, or all users lose the ability to create or edit pages.
Allows page creators to assign permissions or remove pages they create.
Masks all email addresses in a "mailto:" link.
Specifically designed to reduce parallel pages will redirect someone trying to create "trains" to "train".
When activated this feature shows a small printer icon which when clicked allows a viewer to print just the content of a wiki page (without header info and sidebar tools, etc.)
Admin:
Choose where the page break icons are displayed when page break syntax is used:
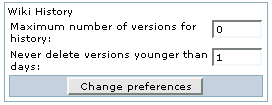
This panel is to control the deletion of old versions of Wiki pages.
Maximum number of versions for historydetermines how many versions of a Wiki page will be kept before older versions are deleted. This affects the level of undo that is possible, but also how much of the page's evolution you can see. This can be useful in a highly collaborative environment where it seems that some elements don't make sense anymore.
Never delete versions younger than days can be used as a basic way to avoid vandals or to make sure that editors can review all the changes done to a page if many edits were done in a short time.

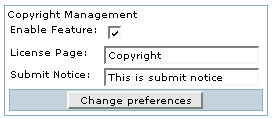
You can use or not the Copyright to specify a content license under which all Wiki pages are published when submitted. License Page indicates the Wiki page containing the default license of your Wiki. It won't be created automatically. Submit Notice is seen when editing a Wiki page to indicate what content is suitable considering the license.
|

|
|
The two first options automatize the monitoring of Wiki pages. Create watch for author on page creation automatically makes a page creator monitor the page he created. Enable watches on comments notifies monitorers of new comments, as for a new edit. Used less often, Enable watch events when I am the editor cancels the normal behavior which assumes that editors do not want to be notified themselves when they modify a page they are monitoring.
|

|
Landing page used for wiki when no page is specified. The page will be created if it does not exist.
If enabled a description can be entered when editing a page and descriptions will be displayed below the page name when viewing a page.
Display the page name at the top of each page as page title. If not enabled, the page content should be structured to contain a header. If disabled no title will be displayed (and it will be hard to know what page you are editing!).
If enabled, the page's unique numeric ID will be displayed when viewing the page.
Display the page version information when viewing the page. As of Tiki 5.0, this information is only displayed when the List authors preference is enabled.
Changes the list format used to display the authors of the page. Listing options include last modification date/time and page version (if the Page version preference is enabled).
For use with the !!- or !!+ syntax. Checking will display the showhide switch at the left of the heading, otherwise it displays below.
This control can be used to control recognition of Wiki links using the two parenthesis Wiki link syntax ((page name)).
Note that this only affects the Wiki syntax ((page name)). It does not affect recognition of the Wiki naming convention of Smashed words starting with capital letters (example: ThisIsSomePage).

If enabled the spellchecker can be used for Wiki pages. See Spellcheck for details on installing the language library (a separate download).
If enabled then when a user is editing a page the edit button will be colored red and the name of the user editing the page will be displayed as a tooltip. If the user saves or cancels his or her edit or if the indicated amount of time passes the edit button will be displayed normally. This feature is useful to prevent collisions when editing pages.
Select the amount of time (in minutes) after which a user's edit session will expire. If the user does not save or preview their work, it will be lost. Tikiwiki will display a "countdown time" in the user's browser and display an alert when only a minute remains.
If enabled, the user who last edited a page can undo his or her edit.
This option was introduced in Tiki 2.0
If enabled logged users can write personal footnotes when editing a page. The footnotes will be displayed only to the user who edited them immediately below the Wiki page. This can be used as a good way to let users make personal notes and observations about pages.
Users with the right permission (tiki_p_minor) can save a Wiki page change as a minor edit. Minor edits do not generate notifications for users who are monitoring the page.
In Tiki 2.0, use the Watch Minor option in the {ALINK(aname=Wiki_Watch)} area to allow notification to be generated for minor edits.
Specify if all wiki pages must be categoried. This will require the use to select a category for the wiki page before saving. Seelct from the following options:
You must enable the Category feature and create at least one category to use this option.
This feature was added in Tiki 2.0.